Lantern Slide Making
Description
This section is from the book "The Barnet Book Of Photography", by Herts Barnet. Also available from Amazon: The Barnet Book Of Photography.
Lantern Slide Making
I THINK we may take it for granted that most photographers know what a lantern slide is, even if he has never made one or seen one made.
It is a transparent print on glass, and one which is intended to be viewed by being projected upon a white screen by means of an optical or what was formerly called a " magic" lantern. This transparent print is now always made, for convenience of handling, storing, and optical purposes, on one size of glass, which in England is 3^ inches square (3 J x 3^).
Lantern slides of to-day are made generally upon commercial lantern plates, and which are to be bought from any photographic dealer. There are many ways and means of making lantern slides, but when I say that 99 out of every 100 slides made, and by the best workers, are on plates bought ready coated, such as Barnet Lantern Plates at is. per dozen, it will be easily seen that no other method of the ordinary worker is worthy of our consideration here. Now let me say at once that any photographer who can make a decent negative can also make decent lantern slides. The making of technically good slides is purely one of practice, in which the worker will find out many unwritten laws as his experiments proceed.
Yet, if one wishes to rise above the level of making ordinary slides there is just as big a field before him as in paper printing. I claim that the slide-maker, if he wishes and has the artistic knowledge and good taste, commands the same power of expression, the same power of control in printing and colour, as does the pictorial man on paper, and if each is shown with knowledge the perfect slide will stand as an artistic production just as well as a paper printan artistic production, not art.
Now to be perfectly practical in the matter of slide-making let me advise all workers to take interest in details of their work, and observe cleanliness in all branches of their slide-making.
We will take it for granted that negatives for slide-making are already at hand, say ^-plate or less (the larger size we will deal with later) all the work is conducted in the ordinary dark room, where a' good supply of water can be at command. The dark room can, when slide-making, be illuminated with a greater amount of safe light than when negative developing.
Now let us see that we have the following articles at hand ready for use :
1. A quarter-plate printing frame, or better still one of the many excellent lantern slide frames, made especially for the purpose.
2. Dish, for development.
3. Dish of hypo, for fixing the slides just as in fixing negatives after development.
4. Bottles of developer as described under " Develops ment".
5. Box of lantern plates as bought from the dealer at about is. per box of 12.
6. A by-pass gas-burner, fixed to gas (if used).
It will be thus seen that one has not a new lot of apparatus to purchase for slide-making.
First of all I would recommend all workers to follow these three rules :
1. Sort out all negatives into three or four classes according to their densities, and make up each class into slides before touching the next. In this way one will soon find the exposure of each batch, and risk of failure will be much reduced.
2. Make a series of trial exposures on one negative from each class, the development of it will soon show the correct exposure.
3. Make a standard distance from the lights for all exposures. Thin negatives, however, may be exposed further away, and dense ones nearer with advantage.
Now we take our printing-frame and place in it the negative, open the box of lantern plates and place one upon that portion of the negative you want to appear on the lantern-slide; place the negative film and lantern plate film face to face just as in making a P.O.P. print; now place upon the back of these a piece of dark cloth or red blotting-paper, and fasten down the back, and we are ready for the exposure, upon which much depends.
If gas be used in the dark room a by-pass burner will be found of advantage, because not requiring to be re-lit after each exposure.
Using the same light, whatever it may be, each time, and holding the frame at the same distance, will make the process much more certain.
There is one point which the beginner should carefully note in holding the frame to the light, and that is, the distance. The theory of illumination may be briefly illustrated as follows :
The intensity of illumination on a given surface is inversely as the square of its distance from the source of light. This means, that if at a distance of one foot from a gas-jet or candle-light an exposure of 30 seconds is correct, and should the distance be increased to two feet, the corresponding exposure will be two minutes, and so on as this diagram shows.
By Douglas English, M.B.
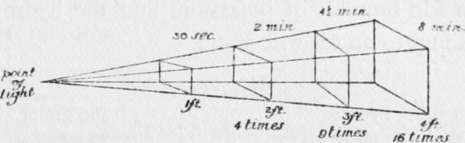
Fig. 1.
But there is this difference in practice, the light has less power to penetrate the dense portions of a negative as the distance increases, and as previously stated, dense negatives are best exposed nearer and weak ones further away from the light.
Let us expose our plate that is waiting in the printing frame say thirty seconds at 2 ft. from a good Bray No. 6 burner and see how far we have been successful.
If any part of the negative is unequally dense and requires more exposure than the rest to bring it fully out, the ordinary portion of the negative should be shaded with a piece of brown paper kept moving, whilst the dense portion receives more exposure.
If the negatives are upon films a piece of clean glass should be placed at the bottom of the printing frame so that it will be held quite flat.
Continue to:
Tags
paper, print, negative, exposure, lens, development, camera, focus