Chapter II. Laying Out And Sawing
Description
This section is from the book "Beginning Woodwork At Home And In School", by Clinton Sheldon Van Deusen. Also available from Amazon: Beginning Woodwork At Home And In School.
Chapter II. Laying Out And Sawing
This first problem is to give experience in good methods of laying out work, sawing, boring and the use of the dowel plate.
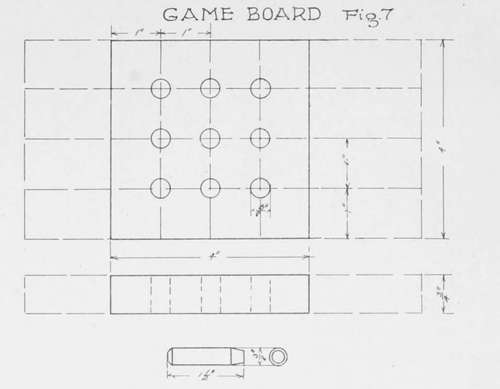
Game Board
The material required is a piece of tulip wood 8" long, planed by machine to a width of 4" and a thickness of :14/;, another piece of the same dimensions to use in practice work, and two pieces of straight-grain tulip wood about 18" long and fe* square for the pegs.
The tools required are a pencil, a marking gage, a knife, a try-square, a rule, a bench-hook, a back-saw, a brace, a %ff auger-bit, a dowel-plate and a mallet.
The working drawing (Fig. 7) should be studied before starting the bench work and an effort made to determine what is to be the length, width and thickness of the completed piece, where the holes are to be located, etc., and as you proceed with the work it is well to consult the drawing frequently that you may understand the reason for the steps, and thus acquire ability to use a working drawing. Below are given the steps to be followed with details of the methods to be used.1
Each paragraph and foot note should be read before starting the work described therein, and then if you have difficulty in following the instructions re-read the paragraph and make sure that you understand it. Technical terms have been avoided as far as possible but if any of those used are not understood the dictionary should be consulted.
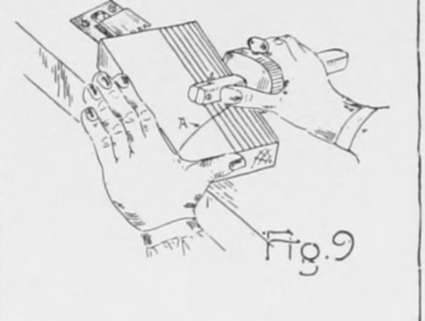
(a) Select one of the broad surfaces of the practice piece, and with a pencil, mark a light slanting line across it (A, Fig. 9) to designate it as the working face, by which term it will be known in referringto it later.
(b) Select one of the narrow surfaces and mark two light slanting lines across it (B, Fig. 12) to designate it as the joint side.
(c) Practice gaging lines on this piece as follows: Set1 the gage so that the little metal point is 1/8" from the gage-block. Take the gage in the right hand and with the left hand hold the piece against the bench-stop so that the joint side is at the right. Place the gage on the end of the piece which is toward you (Fig. 9) and with the gage-block against the joint side. Now push the gage from you, with the top of the iron pin inclined away from you, and at the same time exert a slight pressure toward the left to keep the gage-block tight against the joint side. Do not grip the gage too tight or keep the wrist too stiff while gaging. Make a very light line the first time across, and then pass the gage over it again making the line to the required depth, which should only be deep enough to make a clear, even line. Now increase the set of the gage by 1/8" for each successive line until it is set to 3 1/2" gage slowly and notice that the gage-block is close against the joint side at all times. If still unable to make good lines, repeat the practice work on the other side of the piece.
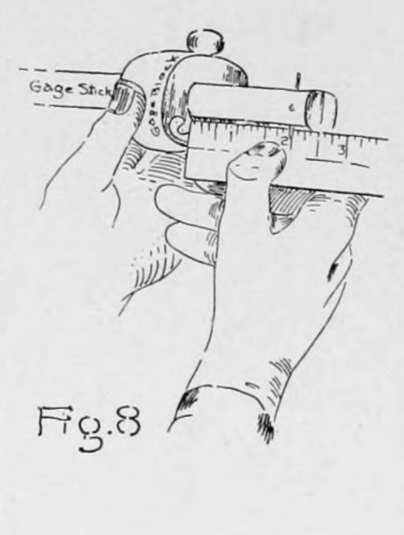
(d) Set the gage as in Fig. 8 so that the metal point is exactly 1" from the gage-block. Mark the working face and joint side on the piece for the game board and hold it against the bench-stop with the working face on top and the joint side at the right. Then with the gage-block against the joint side, gage a line the length of the piece.
'Do not depend on the graduations on the beam of the gage in setting it, but use the rule as shown in Fig. 8.
(e) Change the set of the gage to 2" and gage the length of the piece.
(f) Change the set of the gage to 3" and gage another line the length of the piece.
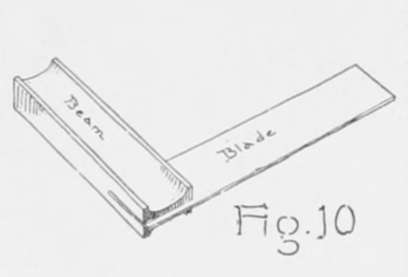
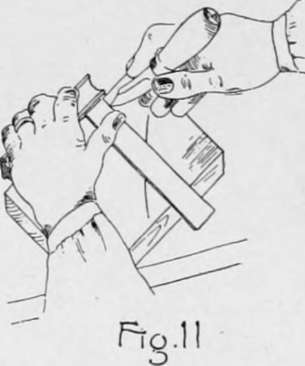
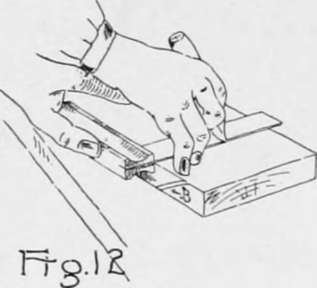
(g) Practice drawing knife lines across the practice piece as follows: Place the piece on the bench with the joint side away from you and place the try-square on the piece with the beam (Fig. 10) against the joint side and the blade on the working face and near the right end. Holding it in this position with the left hand, draw a knife line along the edge of the blade with the right hand (Fig. 11). Always draw the knife toward you with the handle inclined slightly away from the blade of the try-square. When the try-square comes so near to the left end that the beam is not well supported, turn the piece around with the joint side toward you and place the try-square on the piece with the beam against the joint side and the blade near the right end (Fig. 12). Draw the line lightly the first time across the piece and the second time draw it to the desired depth.
(h) When able to draw lines well (as explained in g) you should practice drawing knife lines square around the practice piece in the following manner: Draw a knife line across the working face (as explained in g); then place the piece in the vise with the beam of the try-square held tight against the working face (Fig. 13), and draw a knife line across the joint side, joining exactly with the end of the line drawn first; repeat this on the side opposite the joint side and then with the beam against the joint side draw a line on the surface opposite the working face, joining exactly with the end of the last line drawn. If this work has been done carefully, and the beam in all cases has been held tight against the working face or joint side, this line will also join with the line on the joint side making a continuous line square around the piece.
(i)-Now take the piece for the game board and lay the rule flat on the piece with the graduated edge away from you and parallel to the gage lines (Fig. 14). With the knife held in a vertical position and with the back of the blade against the rule, make light knife marks at five consecutive inch divisions, the nearest of these points being at least 1/2" from the end.
Continue to: